Ripping and Encoding Audio CD
Contents
Introduction
Each day while you work on your computer, you probably listen to music on an internet radio.
If you use file sharing programs, you may notice that, when downloading a song, there are usually different versions of the same song and, even if the file size is the same, they sound different. The quality varies, some even have annoying clicking and popping sounds at the end, because some people don't know how to properly extract the music from their audio CD's.
You should never settle for low quality, it only takes a few minutes from your time to learn how to do thing properly.
In this tutorial, I will try to show you how the professionals are obtaining the best quality audio files from audio CDs, the best way to rip and encode an audio CD.
I'll cover ripping of audio files from the audio CD and encoding them to lossless formats (in order to keep a perfect copy of the disc) or to a MP3 file (for the people that wish to obtain almost the best quality in less storage space).
Copyright notes
In the old days, before audio CD's were invented people used to listen to music on their audio cassette players.
People trying to copy the tapes often experienced what is called ==generational loss==, the copies of audio or video tapes did not sound exactly like the original, there was usually more background noise. Even more, because of the tape's permanent contact to the reading head of the cassette player, the original cassette would lose a bit of its quality with each playback.
On audio CD's, the music is stored in a digital format, with error correction and there is no reading head to touch the disc surface, if a person takes care not to scratch the disc, it will sound the same even after years of playback. With the right tools, people can create a perfect copy of the material on another disc or on a computer.
That is why copyright organizations are more concerned these days and this is why you should know what laws regarding this subject exist in your country.
Some countries do not allow ripping and encoding your legally owned discs, other countries have what is called Fair Use Laws which allow you to make a back-up copy of your disc (in case your original gets scratched or damaged) and possibly even share your music with close friends, as long as you don't make profit out of this.
If you are not sure about your country's laws stance regarding the legality of ripping & encoding legally-purchased CD audio music, you should seek legal advice from a qualified professional before doing anything this tutorial teaches you.
I do not condone piracy, the artists deserve to be paid for their music. I only believe the buyer should have the freedom to make a copy for safe keeping and to be able to listen to the music he/she likes without having to switch CDs for each favorite track.
Tools of the trade
In order to copy audio tracks from an audio CD, we need a CD ripper, a software that scans the disc, extracts the audio data and saves it in a normal computer audio file. In this tutorial the cd ripping software I will use is called Exact Audio Copy] (will call it from now on EAC) and you will see why I chose this one before guiding you through its installation.
After the ripper copies the audio tracks on the hard drive in a standard basic audioformat, it can use an encoder (also called codec) to encode the audio data in the audio format of your choice. This is in most cases needed because this basic format also takes a lot of space on your hard drive, after all it's a 1:1 copy of the disc.
There are two types of audio encoders, "lossless" and "lossy" encoders.
Lossless encoders analyze the audio data and compress the contents without losing audio information, just like normal file compressors. This is ideal for archiving purposes because the compressed content is exactly the same as the original ripped audio track. The size of compressed audio tracks is usually about 50% of the original track.
Lossy encoders analyze the audio data and remove parts that can barely be heard with a normal ear, for example a very low noise just before a loud noise or frequencies over 16 kHz, which usually can only be heard by young children. When this happens, it is said that encoders follow a psycho-acoustic model to sort out what a normal person is able to heard and discard everything else, to keep the file smaller.
Two lossless encoders will be introduced in this tutorial - Monkey's Audio and FLAC - and one lossy encoder, LAME MP3 Encoder. There are other lossy encoders, that encode in much better formats but these will be discussed in a later guide. The Lame MP3 Encoder creates the best MP3 files and this is enough for the purpose of this tutorial.
Let's move on and install the applications.
First I show you how to install the Lame MP3 Encoder because, as you will see later in the tutorial, it simplifies the process of installing EAC. If you only wish to encode audio tracks with a lossless codec, you may skip the next page.
Installing Lame MP3 Encoder
This encoder has originally started as a source code written for studying audio compression technologies. In time, programmers all over the world added code and improved it. After lots and lots of blind tests and years of tweaks, LAME MP3 Encoder is considered better or at least at the same level as professional state of the art audio encoders.
The LAME web site does not contain any compiled version of the encoder, usually you would have to download the source code and compile it yourself. Fortunately, other people already did this and compiled versions of LAME can be downloaded from Rarewares.
We are interested in either LAME 3.96.1 or LAME 3.90.3, these versions are tested a lot and certified to be in good working order. If you are still not sure what to download, click on the entry entitled LAME 3.90.3 , Bundle includes lame.exe, lame_enc.dll (--alt-preset standard & extreme with -Z option) (ICL4.5) or download the modified bundle.
These versions are of special interest because they contain some nice presets that make the configuration easier.
After you download the zip package, extract the contents of the archive in one folder, for example C:\LAME.
That's about it. Read the LAME documentation if you wish and them let's move on to installing EAC.
Installing EAC (I)
You probably wonder why I have chosen this particular CD ripper software when there are lots of other tools available and all should do the same thing, create a perfect copy of audio tracks on your hard drive.
Well, in most cases, it's not that simple.
Audio tracks are not stored on an audio CD like regular files. Their format is very basic, just enough for a regular CD player to understand where a track starts and where it ends. You need an application that can scan the disc and copy the contents of a track in a standard format your computer can understand. Because of this basic format the music is stored on an audio CD, there is just a very weak error correction on the disc.
If a CD is dirty or scratched, stand-alone CD players and regular CD rippers try to correct the erroneous information as much as possible but if they're not able to fix it in a short amount of time, they usually skip it, thus resulting a clicking or popping sound.
EAC is the only CD ripper at this moment that has a special ripping mode called secure mode. In this mode, if a scratch or a problem is detected on the disc, EAC will go back again and again, even for hours if needed and allowed, inspecting the surface of the disc and trying to reproduce as accurately as possible the audio tracks onto the hard drive.
A fast CD ripper usually makes one single pass over the surface, obtaining the audio content and saving it on your drive, it uses almost no error checking during transfer, that is why it is very fast. But being fast does not mean good in this case, we are more concerned about audio fidelity.
You can download EAC from the download section of their site, any version is good, even if it's beta. Download the zip package, extract the whole content of the archive in a folder, I recommend C:\EAC.
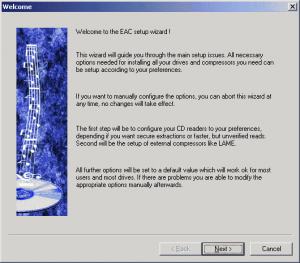
As soon as you start Eac.exe from the location where you have extracted the files, you will be greeted with a wizard.
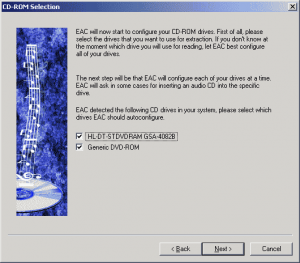
Click Next. In the next screen, the wizard will show you the units it is able to detect and allow you to check which ones you would like to use with the application.
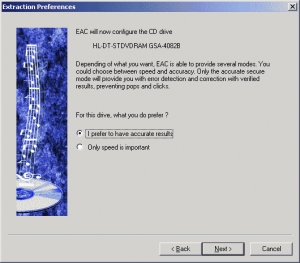
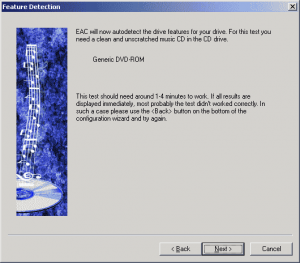
As you see from the picture to the left, I have two units available, and I wish EAC to configure both of them automatically. For each unit, you will see at first the following image.
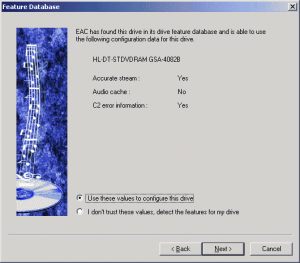
and after you click Next, it will either ask you to confirm the results...
or it will ask you to insert an audio CD in the unknown unit and test it:
Installing EAC (II)
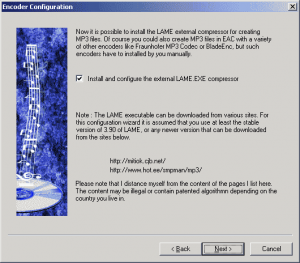
After all drives are configured, the wizard will ask you if you wish to install the LAME MP3 encoder or not. If you did install it previously, leave the option checked, otherwise uncheck it or review the previous page, install the encoder and check the option.
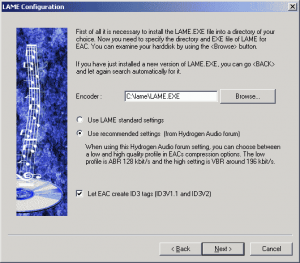
If you chose to leave the option checked, in the next screen the wizard will automatically search your drives for the location of the encoder and it will find in C:\LAME, if you have followed my recommendation.
It's better to allow the encoder to use the recommended settings from the Hydrogen Audio forum, because the people there are specialists and involved in the development of this MP3 encoder.
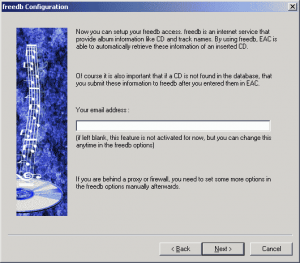
If you wish to use the CDDB service (a free service that gives you the audio track information of the disc so that it relieves you from the trouble of writing the file names), you'll have to enter your e-mail or any e-mail you wish in this wizard page.
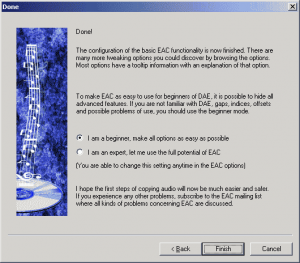
This is the last screen of the configuration, it's ok to leave it as it is, to show the only the options that a beginner would understand.
That concludes the installation of EAC, there are just a few more configuration options that we should browse through.
Configuration and Ripping
If you open the EAC Options panel by pressing F9 or by clicking the option from the EAC menu, you will see lots of options. Most of them are self-explanatory but just a few are important and I feel the need to explain them.
In the Extraction tab, at the bottom left corner there is a combo box called Error recovery quality. This tells EAC how much to insist on a specific region of the disc trying to recover data, if the disc is damaged or scratched there. Usually, the default option is good, set it to High only if you have a very scratched disc.
In the Filename tab, you can set a pattern that EAC would use to save the files. For example, you can use "%N. %A - %T" to save files like this: "1. Artist - Title".
That's about it with this configuration panel, there is another one called Compression Options that can be accessed by pressing F11 or by clicking the option with the same name in the EAC menu.
If you have selected to use the LAME MP3 Encoder, you can see its settings in the tab called External Compression. The codec is already configured to create top quality mp3 files with variable bitrate, averaging at about 192 kbps. This is the CD quality preset, not the 128 kbps we were used for so long. If you want more quality, you can increase the bitrate, 256 is enough even for picky people and 320 often cause no noticeable differences.
In case you wish to encode the files using other codecs that may already be installed on your computer, you will have to uncheck the option Use external program for compression in this tab, go to the Waveform tab, select from the first combo list the codec you wish to use and then, from the second combo the quality level or any other option that codec may have.
From this point the configuration of EAC is complete, close the panel if it's still open.
If you have more than one unit, select the one you wish to use from the combo box in the left area of the main window, insert the audio CD, select the audio tracks you wish to store on your computer. Now we are ready to rip the files.
Click on the second button on the left, the one that has MP3 written on it, to rip the tracks and encode them using the external compression program we specified (LAME MP3 encoder) or click on the first button - the one that says WAV - to save the tracks in the standard basic WAV format.
In the first case, as soon as each audio track is ripped, the ripper starts the LAME MP3 encoder and waits for him to finish. If we wish to encode the tracks in lossless format, we are not really concerned with space, therefore it's better to rip the whole disc without pauses and then use the utilities that come with the lossless encoders to encode the audio tracks.
Lossless encoding
As I have already mentioned, lossless encoders are great because they compress the audio tracks and yet manage to keep it identical to the original, when played back.
I have decided to introduce you to Monkey's Audio and FLAC. Why 2 when they both do the same thing?
Well, the first has a very good compression and it's a very good idea to use it for archival purposes but it has poor seek abilities, meaning when you jump in different places in a file, usually everything pauses for about 2-3 seconds. FLAC has no problem with this but its compression is also a bit lower, usually a 100 MB FLAC file can be compressed in 92-95 MB using the Monkey's audio encoder.
Both codecs are very easy to install, they have a setup wizard. Monkey's Audio even asks you during setup if you wish to install a plugin that allows Winamp to play the encoded files. FLAC also has a plugin for Winamp but it must be downloaded separately.
Monkey's Audio can be downloaded from Monkey's Audio site , the download section.
FLAC can also be downloaded from the downloads section on their site, the one you are looking for is called FLAC 1.1.2 for Windows with installer at the time I am writing this tutorial.
A good FLAC Winamp plugin can be downloaded from Winamp's site.
Once you install the codecs, you can open them from the Programs menu.
Let's start with Monkey's Audio.
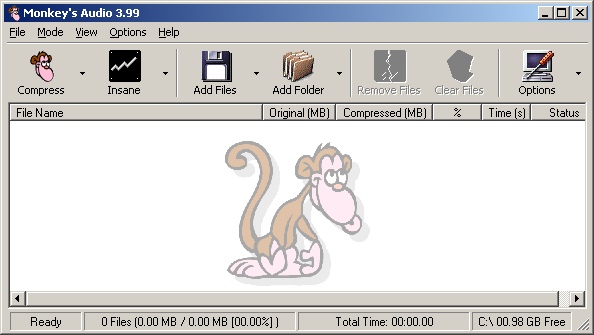
As you see the interface is very easy, adding files or folders can be achieved by clicking on the Add Files icon or the Add Folder icon. The level of compression can be set by clicking on the second icon in the toolbar. The fastest (and lowest) compression is the Fast option and the slowest (and strongest) compression is called Insane. When everything is set up, all you have to do is to click on the Compress icon. If you wish to decompress some ape files (the Monkey's Audio file extension), simply add the files and click on the arrow near the Compress icon and choose Decompress. The encoded or decoded files will be saved in the same folder where the originals are.
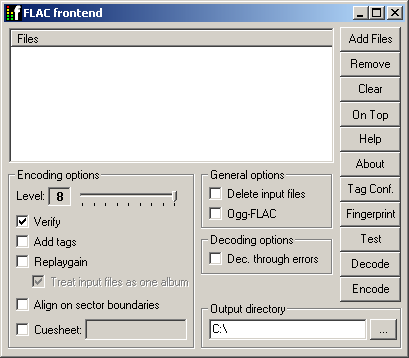
The FLAC encoder has a similar approach :
You can add files by clicking on the Add Files button, set the level of compression from the Level slider (0 means fast, less compression and 8 means slow, maximum compression) and specify where encoded or decoded files will be saved by clicking on the button on the bottom right part of the window and selecting the output folder. If you don't have a lot of free space on the drive, you can check the option to automatically Delete input files as soon as a track is encoded. You may have guessed already, click Encode to encode an audio track or Decode to decode it.
Conclusion
You have learned how to rip audio tracks from an audio CD and encode them in a lossless format, for archival purposes, or on the MP3 lossy format.
In this tutorial I have used MP3 compression as an example because everybody knows about it and almost all modern portable music players support it. What you should know is that technology evolves all the time and, as the MP3 format is already 10 years old, new lossy formats have appeared that sound better than this popular format. Just a few of these formats that come in mind right now are Ogg Vorbis ("ogg") , Mpeg Plus ("mpc") or the patented MPEG-4 audio encoder ("aac"). Feel free to search on the Internet for more information about these encoders and to experiment with different qualities and formats, only you can decide what is best for you. A guide about various audio compression codecs will be on this site at a later date.
